Saturday, December 17, 2005

Fassbinder's Whity

Whity (1971) is one of the lesser known films of Rainer Werner Fassbinder, the prolific German director of no less than 43 films, 14 plays, 4 radio plays, and 24 cinema and television scripts, all created in a short career that lasted less than twenty years. (And what exactly have you been doing with your time?)

The ever modest Fasbinder once said, "I'd like to be for cinema what Shakespeare was for theatre, Marx for politics and Freud for psychology: someone after whom nothing is as it used to be." It's an outrageous claim but after seeing a few of his films (my favorites so far are The Bitter Tears of Petra von Kant and Fox and His Friends and Veronika Voss) I'd say he came pretty close. In my eyes, he has more right to make this claim than any other director.

Although they aren't for everyone, I find that the best Fassbinder films are objects of almost infinite interest, incredible tapestries of resonant images, layered sounds, multifaceted characters, whose inner lives seem to be just hinted at with the smallest and subtlest brush strokes of dialogue, but by the end they seem as rich and complex as real human beings. His films are so detailed and compelling that any element, any frame, an exchange of glances between characters, could be potentially held up, dissected, and discussed, the way certain academics can brilliantly analyze, say, Shakespeare's use of the word "cold" in the sonnets or such. His films are that detailed, that good.

Having said that, I'd have to classify Whity as one of his less accessible, less successful films (If you're new to Fassbinder I suggest starting with one of the movies I've listed above, with the caveat that his films aren't for everyone. They leave some people cold).

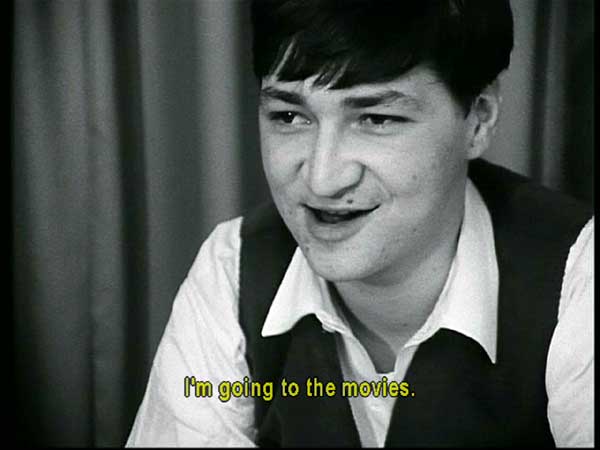
Fassbinder who loved playing with the genre film uses the tropes of the Hollywood western to tell the story of Whity, a black domestic servant in a detoriating rancher family in the old West. It's an opportunity for Fassbinder to examine his usual themes of domination, power, history, freedom and personal choice (He never thought small, by the way). As usual, he mixes and plays with genre: the European gothic, the Southern slave narrative and the Western (!) (Picture, if you will, an old buckaroo in a ten-gallon hat sauntering into a dirty saloon, sidling up to the bar and ordering "Ein vhisky, bitte!")

It's a mashing of elements that I think most American viewers--including myself--find hard to get a grip on, which may explain its lack of a larger reputation here. It's also a movie in which the major revelations, the character development and information, come dropping slow, which can be a challenge for audiences. Like a lot of Fassbinder films, it demands multiple viewings, but its themes of human cruelty, control and violence--coupled with its strange amalgamation of genres and B-movie Western movie imagery (among my least favorite in all of film history)--don't exactly make it the most inviting of his films to come back to. I did, however, end up taking a second look with Jeff who fell asleep the first time, and I appreciated it a lot more the second time around.

It's a fascinating piece of the Fassbinder oeuvre. (He almost always used the same group of actors--like Warhol's superstars--so it's interesting to see the same faces wearing new hats). But, in the end, in my opinion, it simply doesn't rank up there with his own strongest work.

FilmStock Rating: B+

Tofu Steaks

Last night, Jeff made tofu steaks. It's a great, healthy, cheap recipe to make when you're not in the mood to cook something elaborate. It's vegetarian fast food.

To make the recipe, you'll need a block of extra firm tofu, some olive or vegetable oil, some soy sauce plus some other optional flavorings, such as honey, Worcestershire, mustard and/or hot pepper sauce. A really good non-stick pan is also essential.

1. It's best to start by pressing the tofu to get some of the water out. Just place the tofu between two plates, laying a (small) weight on the top plate. (If your weight is too heavy your tofu will split). Leave it for about twenty minutes. If I'm in a real hurry I sometimes skip this step with okay results, but pressing it gets the water out and allows the tofu to absorb more flavors, giving it a wonderful, chewy texture when it's cooked.

2. Cut the tofu into rectangles, or "steaks." A one-pound block of tofu usually cuts up into about eight steaks, about 2.5 by 4 inches.

3. Heat a couple tablespoons of oil in your pan over medium-low heat, and once it's hot, lay your steaks in it and slowly sautee them til golden, then flip the steaks and repeat (about 6 minutes per side on medium heat).

4. While those are cooking, prepare your sauce. Use two tablespoons of soy sauce as a base, and add other flavorings as desired. We usually like a mixture of salty sweet sour and spicy: the soy plus honey, a few dashes of vinegar, and Trappey's red bull sauce but variations with Worcestershire, five spice, mustard and ginger have all turned out great. In all you should have about a quarter cup of sauce.

5. When the steaks are good and golden, pour the sauce over them and shake the pan to coat. The sauce will quickly turn into a glaze. Turn the steaks in the glaze a bit to cover.

That's it. You're done. Serve the steaks with a side of steamed vegetables. Or wrap them in toasted tortillas and top them with lettuce, tomatoes, sliced pickles and Dijon mustard.

Friday, December 16, 2005

Indian Dal with Radishes

Last night, Jeff and I made dal, which is a spicy lentil-based Indian soup. Dal is so simple to make, so nutritious and so CHEAP (not to mention delicious) that I'm surprised it's not more popular here. Jeff and I make it about once a week, sometimes more when we‘re broke.

To make the recipe, you will need to buy some form of lentil. If you're only familiar with brown lentils, you'll be surprised to discover how many forms of lentils there are. Red, green, white, black, split, whole, with skins, without skins. You name it. The most commonly-used dal, the one that's easiest to find--and the one I use in this recipe--is called "split moong dal," usually sold without the skins. It is small and yellow. You can find it at Indian and other specialty markets. If for some reason, you don't have an Indian market nearby, you can substitute dried yellow or green split peas which are available just about anywhere.

As I said, dal is incredibly cheap. The market I go to, Chamblee International Farmer's Market in Atlanta, sells split moong dal--and just about every other kind you can think of--in bulk for as little as fifty cents a pound. Considering you only need one cup of the stuff to make a soup that feeds about 4 people, you can see what a total deal it is. It's also easy. It takes about an hour of time to cook, about 5-10 minutes of which are actual work.

You'll also need some Indian spices for this recipe. If you don't have those around, just a simple basic curry powder will flavor the soup nicely.

1. Pick through your lentils to make sure there are no rocks or chafe in them. Put them in a pot and rinse them in several changes of water. Drain well and then add water in a ratio of 1:4 (ie If you're using one cup of lentils, add four cups of water. Two cups of lentils, eight cups of water, etc).

At this point you can add some of the spices to the pot if you like. There are a few that work well when they're added at this point: a teaspoon of turmeric, a fresh or dried chili pepper, a hunk of ginger.

2. Bring the lentils to a boil over medium heat, then reduce the heat to low and simmer the lentils until they are good and soft (about 30 minutes, sometimes less sometimes more).

3. When they're very soft, whisk the soup with a fork, wire whisk or immersion blender to achieve a smooth puree. At this point, you can add some vegetables if you like: We added fresh, organic radishes with their greens to ours. Spinach is good, too. Countinue cooking until the vegetables are soft, about 5 to 30 minutes depending on the veggie.

4. Heat some oil (we use two tablespoons of olive oil, but Indian ghee or clarified butter is more traditional) in a frying pan and when it's hot, throw in your other spices. Throw in your seeds first and fry them until they're brown, about 30 seconds. What are some good "seed" spices to add? A teaspoon or two each of cumin seeds, fennel seeds, fenugreek seeds, coriander seeds, mustard seeds, in any combination you like, accompanied by dried crushed red chili flakes and a tablespoon of sugar. When the seeds are brown--but before they start to burn--throw in your dried ground spices: curry powder (if that's all you have around), ground cumin, ground coriander, chili powder. Immediately--quick!!--dump the spicy oil into the cooked dal. It will sizzle loudly but do not be afraid.

5. Stir in some fresh herbs--chopped coriander or parsley. Salt to taste, then ladle into bowls, top with a dollop of sour cream or yogurt, a bit of hot Indian pickle or chutney on the side. DELICIOUS! Indian nan bread (or toasted pita) and/ or rice make great accompaniments. Jeff and I usually drop in cubes of diced tofu to up the protein content.

I suggest keeping it simple your first few attempts at Dal. (Sometimes the simplest dal soups are the best: even the most basic dal with just one or two spices will surprise you with its satisfying complexity). As you get more adept at making this simple soup you'll want to explore the world of Indian spices: kokum, curry leaves, anardana, asafetida, ajwan seeds. Try stirring in some grilled onions and garlic. Vary the vegetables. Every dal you make will be different and every dal, once you get the hang of it, will be delicious.

Narnia: Why I'm boycotting

I don't plan on seeing the new movie version of "The Lion, The Witch and the Wardrobe." In fact, I'm planning to boycott the whole series.

The reason is because I don't like that type of movie to begin with (which makes a boycott really easy), but also because CS Lewis, the author of the children's books, specifically expressed his opinion that a live-action version of the books would be all wrong, and he even more explicitly expressed his distaste for Disney films, calling them vulgar. (I agree).

Here is Lewis in a letter to a colleague in 1959:

"I am absolutely opposed--adamant isn't it!--to a TV version. Anthropomorphic animals, when taken out of narrative into actual visibility, always turn into buffoonery or nightmare. At least, with photography. Cartoons (if only Disney did not combine so much vulgarity with his genius!) would be another matter. A human, pantomime, Aslan would be to me blasphemy."

I'm not going to support the film version of a book that's not at all in line with the vision and wishes of its author, particularly one who is deceased and who can't speak up to object. His words here are perfectly clear: No to live action and no to Disney. No thanks.

Thursday, December 15, 2005

Making Your Own Inari

Last night, Jeff and I went to the Dekalb Farmer's Market. What with the long drive, the holiday Atlanta traffic, and the time we took to price-compare and discuss every single item that went into our cart, we didn't get back til very late. It's a tribute to how simple and easy it is to make inari that we still went ahead and made the meal even though we were dead tired. In all, it takes about an hour, about ten to fifteen minutes of which are actual work.

What are inari? Inari or inarizushi are a form of sushi (the word sushi in Japanese refers to the seasoned rice, not the raw fish as many people believe. It is possible to eat an authentic Japanese sushi meal that is 100% vegetarian, even vegan). Inari are incredibly popular in Japan--they are sold at every 7-11. Almost every Japanese fast food joint will have a tray of them sitting out. They are "picnic" food or a quick meal-on-the-go, sort of like the Japanese version of a sandwich.

A piece of inari is seasoned rice stuffed into a piece of fried, simmered tofu. Sounds strange, but the sweet tangy seasonings of the tofu and the yumminess of the rice make this the tastiest of treats. Once you try them, you'll be addicted. Take a peek at what they look like. Make a ton of them and you'll have some to take to work the next day for a quick, healthy, authentic Japanese-style lunch.

To make inari, you will need to buy the inari wrappers. They come wrapped in plastic or else--the way I most often find them here--in a can. You can find them at a Japanese, Korean or sometimes other Asian grocery stores. The Whole Foods in Atlanta often has them: they're always available at the giant one up near Marietta. You can also order them on the Internet. (Just google Inari or Inari-no-moto (ie instant inari)). At about $2-3 a can, they might seem kind of expensive, but, considering the fact that pieces of Inari usually cost about $1-3 a piece at a restaurant, it works out to be an ok deal.

1. To get started, wash two cups of rice well and then drain thoroughly. (Sushi rice works best, but any short-grain sticky rice will do). Put the rice in a pot and let it soak in two and a half cups of water for half an hour to an hour. (We skipped most of this step last night because we were in a hurry. The rice came out fine.) Bring the water to a boil over medium heat, and when it's boiling, turn the heat to low, and cover. Let it cook for 20 minutes. Do not lift the lid to check the rice!! Not even to peek!

2. During the soaking of the rice is a good time to prepare your seasoning: Mix a quarter cup of rice vinegar, a quarter cup of sugar and a half teaspoon of salt in a cup. When the timer for the rice goes off, remove the pot from the heat and let it sit--undisturbed, still covered, do not peek!--for 15 minutes.

3. While you're waiting is a great time to make your other stuffing. What else to put in the inari? Just the rice is fine, of course, and in Japan it's the most popular option. But use your creativity if you like, even try a bit of fusion! I always throw in a couple tablespoons of toasted sesame seeds. If you're not a vegan, some cooked eggs, omelette-style, help up the protein content. Slivered sauteed shitake mushrooms, steamed spinach squeezed dry, slivered pickled burdock root, umeboshi plums, some kimchee. Go wild. The two things to remember: Rice should predominate (use the other fillings just to flavor the rice) and whatever you use should be cut small, about the size of the grains of rice or barely bigger.

4. When the rice is entirely done, dump it out onto a big flat baking tray. Throw in the seasoned vinegar. With one hand, fan the hot rice with a magazine or such (I keep one of those Southern style "church fans" around just for this purpose) and with the other use a wet wooden spoon to mix the vinegar into the rice. (This is easier if you have an assistant to do the fanning!) Stir in your sesame seeds, shredded omelette, spinach or whatever else, if you're using it.

5. Stuff your inari wrappers with the rice mixture. Place them on a serving tray along with the yummy stuff served with sushi: wasabi horseradish, pickled ginger and a dish of soy sauce. Serve with hot green tea. Delicious!

Projector vs. Plasma

My parents were recently looking to buy a new TV/video set-up, primarily for watching DVDs, and they went a slightly unusual route: they bought a digital projector.

I think it's a fantastic way to go. The picture quality is equal to--and often surpasses--plasma TV. The screen size is definitely much larger. And the cost is much cheaper.

They went with the Epson MovieMate which projects onto the 92" screen it comes with. The Epson MovieMate retails at about $1100-1200. It comes with a DVD player, a decent 2.1 sound system and a screen. Plasma screens aren't even made that size, but if they were, the cost would be at least $3000 plus mounting plus installation plus sound system plus DVD player.

And as every movie buff knows, there's just something ineffable, something RIGHT about a projected image, that just makes you say: Now I am watching a movie just like in the theater.

Right now, (although I'm pretty broke) I have my eye on the Infocus ScreenPlay 4805 Digital Projector. It retails at about $999, but you can pick it up, factory refurbished, on E-bay for about $700. I hope they come down in price even more. Customer ratings are high on opinion sites and message boards: it's practically a cult.

Almost any multimedia projector--such as the ones businesses use for Powerpoint presentations--can be hooked into a DVD player, but many--such as the Infocus or the Epson MovieMate--are made specifically for home theater use.

If you're considering buying a new plasma TV, I highly suggest you start exploring the idea of digital projectors as well. It's a mystery to me why plasma TVs (expensive, costly to install) are so much more well-known and desirable than digital projectors (less expensive, simple to set up).

I'm doing some house-sitting for my folks over the weekend, and they've invited me to watch movies on their system, so I'll be able to offer a full review of the Epson MovieMate in an up-coming post.

[Note: Read that later review here.]

Wednesday, December 14, 2005

Making Your Own Pizza

Last night, Jeff and I made pizzas. One was tomato, mozzarella, broccoli, and garlic, the other was feta, spinach, olive and carmelized onion. Fantastic!

If you've never tried it before, making your own pizza is much simpler and faster than you'd think. The "hardest" part about making pizza at home--for those who've never done it before--is making the crust. I put "hardest" in quotes because, although making crust DOES require some practice and experience, it is actually incredibly simple. Many people who have never done it before are intimidated and think it must be hard. There's no need to be a frightened, little chickie. With practice, you can get results in your own oven that rival, or even surpass, take-out and restaurant pizzas... at a fraction of the cost.

For this recipe you will need some yeast, flour, olive oil, salt and whatever you want to put on top of your pizza: tomato sauce, cheese, favorite toppings and spices (oregano, crushed red pepper, rosemary, basil and whatever other Italian spices you like, dried or fresh).

Lots of recipes will tell you that you need special equipment to make pizza at home: a baking stone, a pizza peel, etc. Those things are certainly very nice but I think it's possible to get great results with nothing but what I've listed above, a baking pan and an oven. That's all you need to get started.

The process of making pizza takes several hours, about 15 minutes of which are actual work.

Begin by putting about one cup of room temperature water in a big bowl. Dissolve a teaspoon of sugar in it, then dissolve your yeast in there too (one package or one and a half teaspoons of yeast). Then stir in one cup of your flour.

There. You've just made the "madre" or "mother" of the dough. You just gotta wait now til mamma's ready. You should wait at least fifteen minutes til the mixture is bubbly and yeasty smelling, but I've found that the longer you wait with this step, the tastier the pizza crust can be. This is a great step to do in the morning before you head to work or whatever. Then proceed with the rest of the recipe in the evening when you get home.

When your "madre" is ready, stir in a teaspoon of salt and a tablespoon of olive oil, and then about* three cups of flour. Stir the dough together until it forms one mass and then transfer it to a clean counter that you've sprinkled with a little bit of flour. Begin kneading it: press it hard against the counter with the heel of your hand, stretching the dough, give it a quarter turn and then repeat. Do this for about five to eight minutes.

*(This is the part that takes some practice: recognizing how much flour to put into the dough, how much is too much and how much is too little. Variations in types of flour, the humidity of your kitchen, the temperature, etc. will all effect your dough. You just have to learn to recognize what the dough should look and feel like. After you knead it a bit, the dough should come together as a non-sticky, pliable smooth mass, like Play Dough. If it seems dry, stiff and shaggy, you'll need to a add a bit more water. If it's a wet sticky mess, you need to add more flour. Just remember, getting it right takes time and practice. And remember that pizza crust is very forgiving, so even if you haven't gotten the proportions perfectly right, your results at the end will probably be okay, as long as you got close. Like Woody Allen famously said: Sex is like pizza. Even when it's really bad, it's still pretty good).

Now put the dough back in your big bowl, pour a tablespoon or two of olive oil on it and toss it around in the bowl so that the outside of the dough is evenly coated with the oil. (This is to make sure the dough doesn't dry out during its rising). Cover the bowl with a clean, damp wash cloth (make sure the cloth doesn't droop down and touch the dough... it will stick). Place in a warm place to rise (the oven, turned off with the light on is usually perfect) for an hour to an hour and a half.

There. You're done with the hard part. That wasn't so scary, was it?

While that's rising is a good time to get your sauce and toppings ready. I like to arrange them on a cutting board or plate because you'll have to work kinda fast once you're ready to assemble the pizza.

(Here's a great tip for you that took me years to learn. What's the best sauce to use? I've been making pizza for years and I've tried every type of tomato sauce from fancy gourmet jars to Ragu to homemade with fresh garden tomatoes. Which is the best? What spices are best to add to the sauce? You won't believe me, but the best sauce, the one that will earn you the most oo's and ah's is plain old Crushed Plum Tomatoes (not sauce, just the tomatoes) straight from the can. Try it, you'll see).

Select a baking pan for your pizza. If you have some sort of stone or clayware baking pan, that's great, if not metal is fine. Use what you would use to make cookies: something long and flat, ie pizza sized. Don't worry if it's square or rectangular. I promise: square pizza taste just as good as round.

When the dough is done rising (it should be bigger and poofy-looking), remove it from the oven. Preheat the oven. The hotter the better. If your oven goes to 500 degrees that's good. Professional pizza ovens can get up to about 1000 degrees. Obviously there's no way you'll get your home oven that hot, but it just shows you that you need a HOT oven for good results. If you have a convection or intensive baking setting, now is the time to use it.

Once the oven is preheated, put your baking pan into the oven with nothing on it. You're preheating the pan so the bottom of the crust will get all crispy and yummy, not soggy.

Roll out your dough on a lightly floured surface with a rolling pin or wine bottle or such. If you'd like you can try tossing it up in the air, a la Luigi. This gets air into the crust, and technically stretching the dough this way rather than rolling it is correct and yields better results. (But I find that a rolling pin works fine: it's certainly faster... and easier for the non-professional. And you don't risk dropping your hard work onto the floor!).

When the pan is good and hot remove it from the oven with a pair of oven mitts. Place it on a burn-proof surface or oven mitt on a counter.

Now... QUICKLY!!... Assemble your pizza. Throw your dough onto the pan. Again, you're not looking for perfection: little folds or slightly uneven dough, weird shapes are fine.

Spread on some olive oil, then the sauce, sprinkle with a little salt, toss on your toppings and cheese, sprinkle on your herbs and then slam it back into the oven. Keep an eye on it. I find that eight to ten minutes is usually about right. You'll know when it's done: it'll smell awesome and it will look, well, like pizza.

Remove from the oven, slide it onto a wooden cutting board if you can, cut and enjoy!!

Palindromes

Palindromes (2004) is the latest film by Todd Solondz, who you may remember as the writer-director of such up-lifting, feel-good films as Happiness and Welcome to the Dollhouse.

Palindromes tells the story of Aviva, a teenage girl who gets pregnant, gets an abortion and then runs away from home, ultimately taking up with a born-again musical-number singing Christian family full of deformed adopted children called--what else?--the Sunshines.

A "palindrome," is a word or phrase that's the same forwards or backwards, like Anna, sex of foxes, or, the main character's name Aviva. It doesn't change, even backwards... And that's in some ways what the movie is about. Change... or rather the lack of it... stasis. As one of the characters asks in a bitter monologue... Do we really ever change?

The gimmick--if that's the right word--of Palindromes is that the character of Aviva is played by different actresses throughout the film. We see Aviva change weight, race, hair color, etc. but what, as she accumulates these horrible experiences, about her is really changing?

What is the nature of change when we say "I've changed"? What is the nature of choice? Do we really ever choose anything? Or are we just--as Solondz seems to be suggesting--blindly and stupidly stumbling through experience, filling out a genetically predetermined life, rearranging the surface details at times, but never really changing, never really choosing.

Ellen Barkin does a fantastic job as the mother, who convinces her own daughter to get an abortion "just like mommy did." It's a difficult part, both because of the hot button issues that the plot deals with, but also because Solondz' tone would be--I imagine--a hard one for actors to grasp and convey. We, the audience, vacillate between despising, pitying, sympathizing with, laughing at, and identifying with his characters. I thought Barkin, along with the rest of the cast, nailed it.

And for anyone who thinks that his portrait of the born-again family, their musical numbers, their communal laughter and their maudlin cheerfulness is over-the-top and unrealistic, an exaggerated portrait played up for laughs.... As someone who grew up and lives in the Bible-belt South, I can testify: that is dead-on accurate realism. You could show that portrait to a born-again Christian and they wouldn't balk at seeing themselves portrayed like that: "What a nice family!"

I should mention that Jeff didn't like it and was making fun of me for watching it, but when he got bored, he went into the bedroom to record his reading of Thucydides' Peloponnesian War onto mini-disc, which will give you some idea of what Jeff does for entertainment.

All in all, Palindromes makes for a viewing experience that's great, funny, sad, weird, and ultimately unsettling (and I mean that in the best possible way).

FilmStock Rating: A-

Tuesday, December 13, 2005

Millet Porridge Recipe

Okay. I admit "Millet Porridge" doesn't exactly sound like the most appetizing of dishes, but you'll just have to trust me on this one. It is an unbelievably cheap, healthy and delicious breakfast food.

Millet is a grain ... most often used in this country (US) as birdseed(!). That's kind of a shame because the nutritional profile of millet is really outstanding, and when prepared right, it's really tasty: a toasty, buttery, wholesome flavor that just hits the spot on cold winter mornings.

Did I mention that millet is cheap? You can pick some up for about forty cents a quart. And considering that it only takes a quarter cup of the stuff to make one serving of porridge, you're literally eating a wholesome, nutritious meal for about a nickel. I get my millet at the Dekalb Farmer's Market here in Atlanta, but any decent-sized health food store will probably sell it.

Millet Porridge Recipe
Serves 2

Ingredients:
1/2 cup millet (120 mL)
3 cups water (700 mL)
pinch salt
[Additions to taste: banana, dried fruit, raisins, nuts, apples, strawberries, cinammon, nutmeg, allspice, cloves, maple syrup, honey, golden syrup, milk, soymilk, cream]

Measure out the millet and put it in a sieve. Rinse well. Bring the water to a boil in a small pot with a lid. Once the water comes to a boil, throw in the millet and a dash of salt, and turn the heat down low. At this point you can throw in some raisins or other dried fruits, sliced bananas, apples, strawberries, ground spices (think cinnamon, nutmeg, allspice, cloves).

Cook the millet mixture, covered, on low for about 30-40 minutes. Voila. You're done.

Spoon it into a bowl and add what you like: milk, a dash of cream (heavenly), a pat of butter, honey, toasted nuts, maple syrup, molasses, or jam. (You can also make your millet porridge the night before and heat it in the microwave in the morning if your breakfasts are typically rushed.)

Enjoy!

*To make millet porridge: just remember 1/4 cup millet per person, cooked in water at the proportion of 6:1. ie six times the amount of water as millet. For one serving cook 1/4 cup of millet in 1 1/2 cups of water. For four servings, cook 1 cup of millet in 6 cups of water, etc.

Wine: Vina Borgia

I want to tell you about the most wonderful wine Jeff and I drank last night.

I should preface this wine recommendation by saying I know very little about wine. "I don't know much about wine, but I know what I like," you'll hear most people say when the subject of wine comes up. I am actually one step below this. I sometimes don't even know what I like. A connoisseur friend of mine will open an expensive, sought-after bottle of wine, and everyone in the room will be going into ecstasies of rhapsody about its mellow flavors of orange blossom and brown butter when what I'm tasting seems to be mouse-poop soaked in vinegar and grain alcohol. "Something's wrong with me," I think. "I should really like this. I guess it's okay. I like it. I do, because I'm a sophisticated person, like these people, with sophisticated tastes. I really am. Gulp."

If I'm coming to your house for dinner, please don't break out the good stuff on my account. Just start me off with a couple strong cocktails and then fill my glass with that stuff that comes trickling from a spout out of a box. I'll drink that and be perfectly happy while the grown-ups are sniffing corks and swirling hooch around in their mouths to release the delicate aromas of velvet, peach stone, and cigar box.

Anyway, having said that, I'd like to recommend a great wine to you. It's called Vina Borgia: Campo de Borja, 2004. It is from the wonderful, beautiful, wine-loving, liberal, sunny country of Spain.

We found it at Green's liquor store on Buford Highway here in Atlanta. The bottle is totally nice and the label is pretty, too, so I bet the company is totally legal and legit and you could find it a lot of places.

It was only $7.99 and it came in a giant bottle, twice the size of those puny little micro-sippers wine connoisseurs are so fond of. (Don't they know ANYTHING? Jeesh). We opened it on Sunday night and then stored it in the fridge corking it with one of those wine stoppers where you can suck all the air out of the bottle with a little manual pump. I actually thought it tasted better the second night.

It has a delicate aroma, subtle yet bold, with the slowly developing flavors of, er, velvet, earth and, um, deer? Just kidding. It just tastes yummy. The kind of yum that warms your belly and brings a blush to your cheeks, as if you've had a sip of the Spanish sun on a cold winter's night. You may not believe me after I fessed up about how little I know about wine, but trust me on this one. Get some, you'll love it.