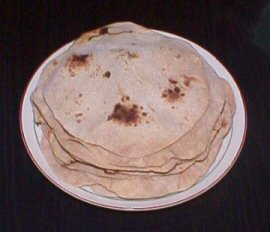
Thursday, February 16, 2006

Flatbread: Recipe

These are great, easy, fun little breads to make. You don't even need an oven.

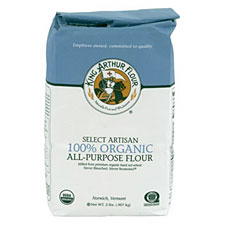
King Arthur bread flour, if you haven't tried it, is really awesome in this recipe (and many others). It's practically becoming a cult with some home-bakers and I can see why. Any type of flour will make a good flatbread, though.

Flatbread

1 cup lukewarm water
2 tsp or 1 package yeast
About 2 1/2 to 3 cups bread flour (or 50-50 mixture of whole wheat and bread flours)
1/2 tsp baking powder
1 Tbsp olive oil
1/2 tsp salt

1. Mix the water, yeast, and 1/2 cup of the flour in a large bowl.

2. Give the mixture at least 15 minutes to get a bit frothy. You can also leave the mixture for several hours (do this step in the morning and make the bread in the evening) to give the bread that "sourdough" taste.

3. Stir in the baking powder, olive oil and salt. Stir in the flour until the dough holds together. If the dough is stiff and shaggy and won't hold together, there's too much flour and you need to add more water. If the dough is sticky and goopy, you need to add more flour.

4. Knead the dough for about five minutes. Put it back in the bowl, cover with the bowl with plastic wrap or a damp cloth and let rise for a little more than an hour.

5. Divide the dough into eight equal pieces, and roll each piece out with a rolling pin into 8-10" flat discs.

6. Heat a cast iron skillet over very high heat. When it's extremely hot, throw on one of the dough circles. When it develops puffy bubbles and a few brown spots on the bottom, turn it and cook it the same way on the other side. When it looks done--it should be puffy and cooked-looking and cooked-smelling, with several tasty-looking brown spots--take it off the heat and start on the next.

7. Serve hot. These are great with hummus. You can also freeze them for later. Top them with sauce and cheese for a great instant "personal-size" pizza.

Wednesday, February 15, 2006

The Meatrix

I love this little flash movie about factory farming.

(I hear there's a sequel on the way. Coming soon to a computer screen near you... The Meatrix: Revolting.)

If you still haven't seen the original Meatrix click here or on the picture to be taken to the movie.

(It's amazing to me that so many meat-eaters STILL think their meat was raised on a sunny little farm. The film is funny and informative without being sensationalistic or preachy: it may be the perfect link to send any friends that still need some convincing.)


Tuesday, February 14, 2006

Not the Wind, Not the Flag

Two monks were arguing about a flag. One said, "The flag is moving."

The other said, "The wind is moving."

The sixth patriarch happened to be passing by. He told them, "Not the wind, not the flag: mind is moving."

Wind, flag, mind moves,
The same understanding,
When the mouth opens
All are wrong.

-From the 13th century Zen text "The Gateless Gate" by Ekai, called Mumon

Richest Chocolate Cake Ever: Recipe

Happy Valentine's Day!

This is the cake I make every V-Day for my baby, my greatest, my own personal Sanrio character. It's so rich I'm not even sure it qualifies as a "cake." There's no flour in it, no baking soda or other leavening, no milk. None of that whimpy stuff to get in the way of the pure chocolate.

The texture is somewhat like cheesecake... and the taste, whoah, the taste is like mainlining pure, unadulterated, pharmaceutical-grade chocolate.

The size is perfect for two. I bake it in a little creme brulee dish, but any small oven-proof dish will do.

(PS If you're single this Valentine's Day, I say make this cake for yourself anyway! Treat yourself! You deserve it for putting up with all the cheesey crap Hallmark & Co. crams down your throat this time of year! And, darn it, who needs love when there's chocolate cake like this??!!??)

Richest Chocolate Cake Ever

3.5 Ounces Highest-Quality bittersweet or semisweet chocolate

2 Tbsp butter
1 egg
1/2 tsp sugar powdered sugar

1. Melt the chocolate and butter together over VERY low heat or in a double boiler.

2. Butter your creme brulee dish and line the bottom with a piece of parchment cut into a circle.

3. Seperate the egg. Mix the yolk into the (slightly cooled) chocolate-butter mixture.

4. Beat the white until soft peaks form. Gently fold the white into the chocolate mixture. (I'm terrible at this, so if you screw it up don't worry: just mix it together as best you can and it will still come out fine).

5. Scrape the batter into your cake "pan" and place the small pan in a larger pan or baking dish. Pour some boiling water into the larger pan so it creeps halfway up the sides of the smaller dish. (This water "bath" helps keep the cake moist.)

6. Place your pans into the oven and bake for exactly 30 minutes.

7. Remove the cake and let cool completely. Refrigerate for several hours.

8. Slide a think knife around the edges and invert the cake pan. (It's so rich and dense it's not always easy to get out of the pan). Peel off the paper liner.

9. To decorate: You can go all out and do a ganache and nuts like in the picture but here's something that's easier and just as pretty. Find a piece of paper that's slightly larger than your cake. Cut out a heart that's slightly smaller than the cake. Lay the piece of paper on the cake, then sprinkle powdered sugar through a sieve so it completely fills the heart area. Very carefully lift the piece of paper. You should be left with powdered sugar in the shape of a heart. Yeah!

10. Store in the refrigerator, but remove an hour or two before serving. Serve with whipped cream, raspberries, strawberries, and/or white chocolate sauce.

Monday, February 13, 2006

Corn Muffins: Recipe


Nothing says "Celebrate good times!" like a big plate of fresh, steaming-hot corn muffins. And if those corn muffins are all in the shape of little ears of corn, it just says, "Why hold back, my little child of the corn? Cut loose and party!"

On Saturday, Jeff and I went shopping at Ranch 99, our favorite Asian supermarket here in Atlanta on Buford Highway. I found a little cast-iron pan that made corn muffins in the shapes of ears of corn for $7.


It seemed a good deal to me, but Jeff said it seemed kind of expensive. I waffled a bit, but finally decided to spring for it. Boy, was I glad I did. Not only did subsequent research on the Internet prove that $7 was a great price for one of those pans, but subsequent cooking proved that corn muffins in the shape of little ears of corn produce way more than $7 worth of awesome fun.

This recipe exactly fills one tray of seven ears of corn. If you're too cheap to spend the seven bucks, you can make the recipe in regular, standard muffin tins (but that will also be your type of fun: "regular, standard").

If you're going to eat the muffins right away, use butter. If you're going to reheat them for later or freeze them, use corn oil. They'll keep better.

Good Time Corn Muffins

1 Tbsp butter or corn oil
1/2 cup good organic corn meal
1/2 cup all-purpose flour
1/4 tsp salt
1 tsp baking powder
1 egg
2 Tbsp melted butter or corn oil
1 Tbsp honey
1/2 cup milk
OPTIONAL ADD-INS: 1/4 cup grated cheese, 2 Tbsp diced green chilies, 2 Tbsp diced chipotles, 1/2 cup fresh or frozen corn kernels


1. Preheat the oven to 375.

2. Butter or oil the pan with the tablespoon of butter or oil.

3. Mix together the corn meal, flour, salt and baking powder in a large bowl.

4. Mix together the egg, cooled melted butter, honey and milk.

5. Quickly stir the wet ingredients into the dry.

6. Stir in your optional add-ins. Another a great way to do this is have a small bowl set to the side. Scoop a little batter into it and throw in a few of the add-ins to taste, then ladle it into the muffin pan. You can make seven different-flavored muffins this way.

7. Once the batter is in the pan, tap the pan on the counter to settle the batter and let it rest for a moment or two so the batter can take on the shape of the beautiful ear of corn.

8. Bake for 20 to 25 minutes or until the muffins have risen and are lightly brown on top.

9. Turn the muffins out and serve hot.


Celebrate, good times, come on!